Writing your first Django app, part 2
This tutorial begins where Tutorial 1 left off. We’re continuing the Web-poll application and will focus on Django’s automatically-generated admin site.
Philosophy
Generating admin sites for your staff or clients to add, change and delete content is tedious work that doesn’t require much creativity. For that reason, Django entirely automates creation of admin interfaces for models.
Django was written in a newsroom environment, with a very clear separation between “content publishers” and the “public” site. Site managers use the system to add news stories, events, sports scores, etc., and that content is displayed on the public site. Django solves the problem of creating a unified interface for site administrators to edit content.
The admin isn’t intended to be used by site visitors. It’s for site managers.
Creating an admin user
First we’ll need to create a user who can login to the admin site. Run the following command:
$ python manage.py createsuperuser
Enter your desired username and press enter.
Username: admin
You will then be prompted for your desired email address:
Email address: admin@example.com
The final step is to enter your password. You will be asked to enter your password twice, the second time as a confirmation of the first.
Password: **********
Password (again): *********
Superuser created successfully.
Start the development server
The Django admin site is activated by default. Let’s start the development server and explore it.
Recall from Tutorial 1 that you start the development server like so:
$ python manage.py runserver
Now, open a Web browser and go to “/admin/” on your local domain – e.g., http://127.0.0.1:8000/admin/. You should see the admin’s login screen:

Since translation is turned on by default, the login screen may be displayed in your own language, depending on your browser’s settings and on whether Django has a translation for this language.
Doesn’t match what you see?
If at this point, instead of the above login page, you get an error page reporting something like:
ImportError at /admin/
cannot import name patterns
...
then you’re probably using a version of Django that doesn’t match this tutorial version. You’ll want to either switch to the older tutorial or the newer Django version.
Enter the admin site
Now, try logging in with the superuser account you created in the previous step. You should see the Django admin index page:

You should see a few types of editable content: groups and users. They are
provided by django.contrib.auth, the authentication framework shipped
by Django.
Make the poll app modifiable in the admin
But where’s our poll app? It’s not displayed on the admin index page.
Just one thing to do: we need to tell the admin that Question
objects have an admin interface. To do this, open the polls/admin.py
file, and edit it to look like this:
from django.contrib import admin

from .models import Question

admin.site.register(Question)
Explore the free admin functionality
Now that we’ve registered Question, Django knows that it should be displayed on
the admin index page:

Click “Questions”. Now you’re at the “change list” page for questions. This page displays all the questions in the database and lets you choose one to change it. There’s the “What’s up?” question we created in the first tutorial:

Click the “What’s up?” question to edit it:

Things to note here:
- The form is automatically generated from the
Questionmodel. - The different model field types (
DateTimeField,CharField) correspond to the appropriate HTML input widget. Each type of field knows how to display itself in the Django admin. - Each
DateTimeFieldgets free JavaScript shortcuts. Dates get a “Today” shortcut and calendar popup, and times get a “Now” shortcut and a convenient popup that lists commonly entered times.
The bottom part of the page gives you a couple of options:
- Save – Saves changes and returns to the change-list page for this type of object.
- Save and continue editing – Saves changes and reloads the admin page for this object.
- Save and add another – Saves changes and loads a new, blank form for this type of object.
- Delete – Displays a delete confirmation page.
If the value of “Date published” doesn’t match the time when you created the
question in Tutorial 1, it probably means you forgot to set the correct value for
the TIME_ZONE setting. Change it, reload the page and check that
the correct value appears.
Change the “Date published” by clicking the “Today” and “Now” shortcuts. Then click “Save and continue editing.” Then click “History” in the upper right. You’ll see a page listing all changes made to this object via the Django admin, with the timestamp and username of the person who made the change:

Customize the admin form
Take a few minutes to marvel at all the code you didn’t have to write. By
registering the Question model with admin.site.register(Question),
Django was able to construct a default form representation. Often, you’ll want
to customize how the admin form looks and works. You’ll do this by telling
Django the options you want when you register the object.
Let’s see how this works by re-ordering the fields on the edit form. Replace
the admin.site.register(Question) line with:
from django.contrib import admin

from .models import Question


class QuestionAdmin(admin.ModelAdmin):
    fields = ['pub_date', 'question_text']

admin.site.register(Question, QuestionAdmin)
You’ll follow this pattern – create a model admin object, then pass it as the
second argument to admin.site.register() – any time you need to change the
admin options for an object.
This particular change above makes the “Publication date” come before the “Question” field:

This isn’t impressive with only two fields, but for admin forms with dozens of fields, choosing an intuitive order is an important usability detail.
And speaking of forms with dozens of fields, you might want to split the form up into fieldsets:
from django.contrib import admin

from .models import Question


class QuestionAdmin(admin.ModelAdmin):
    fieldsets = [
        (None,               {'fields': ['question_text']}),
        ('Date information', {'fields': ['pub_date']}),
    ]

admin.site.register(Question, QuestionAdmin)
The first element of each tuple in
fieldsets is the title of the fieldset.
Here’s what our form looks like now:

You can assign arbitrary HTML classes to each fieldset. Django provides a
"collapse" class that displays a particular fieldset initially collapsed.
This is useful when you have a long form that contains a number of fields that
aren’t commonly used:
from django.contrib import admin

from .models import Question


class QuestionAdmin(admin.ModelAdmin):
    fieldsets = [
        (None,               {'fields': ['question_text']}),
        ('Date information', {'fields': ['pub_date'], 'classes': ['collapse']}),
    ]

admin.site.register(Question, QuestionAdmin)

Adding related objects
OK, we have our Question admin page. But a Question has multiple Choices, and
the admin page doesn’t display choices.
Yet.
There are two ways to solve this problem. The first is to register Choice
with the admin just as we did with Question. That’s easy:
from django.contrib import admin

from .models import Choice, Question
# ...
admin.site.register(Choice)
Now “Choices” is an available option in the Django admin. The “Add choice” form looks like this:

In that form, the “Question” field is a select box containing every question in the
database. Django knows that a ForeignKey should be
represented in the admin as a <select> box. In our case, only one question
exists at this point.
Also note the “Add Another” link next to “Question.” Every object with a
ForeignKey relationship to another gets this for free. When you click “Add
Another,” you’ll get a popup window with the “Add question” form. If you add a question
in that window and click “Save,” Django will save the question to the database and
dynamically add it as the selected choice on the “Add choice” form you’re
looking at.
But, really, this is an inefficient way of adding Choice objects to the system.
It’d be better if you could add a bunch of Choices directly when you create the
Question object. Let’s make that happen.
Remove the register() call for the Choice model. Then, edit the Question
registration code to read:
from django.contrib import admin

from .models import Choice, Question


class ChoiceInline(admin.StackedInline):
    model = Choice
    extra = 3


class QuestionAdmin(admin.ModelAdmin):
    fieldsets = [
        (None,               {'fields': ['question_text']}),
        ('Date information', {'fields': ['pub_date'], 'classes': ['collapse']}),
    ]
    inlines = [ChoiceInline]

admin.site.register(Question, QuestionAdmin)
This tells Django: “Choice objects are edited on the Question admin page. By
default, provide enough fields for 3 choices.”
Load the “Add question” page to see how that looks:
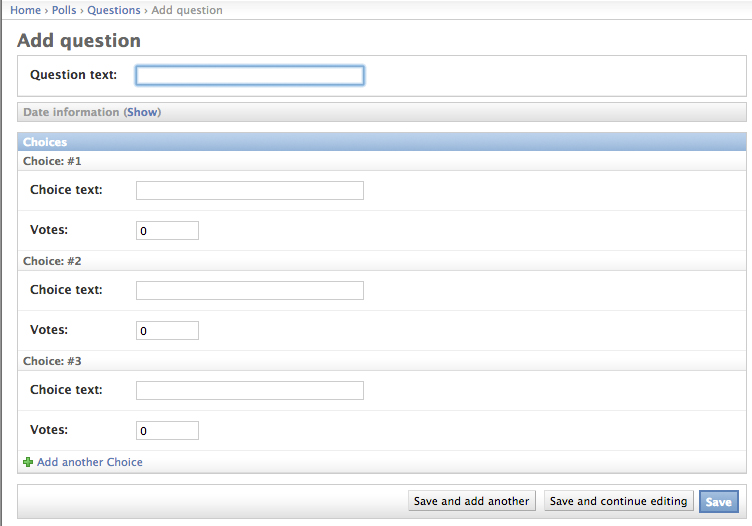
It works like this: There are three slots for related Choices – as specified
by extra – and each time you come back to the “Change” page for an
already-created object, you get another three extra slots.
At the end of the three current slots you will find an “Add another Choice” link. If you click on it, a new slot will be added. If you want to remove the added slot, you can click on the X to the top right of the added slot. Note that you can’t remove the original three slots. This image shows an added slot:

One small problem, though. It takes a lot of screen space to display all the
fields for entering related Choice objects. For that reason, Django offers a
tabular way of displaying inline related objects; you just need to change
the ChoiceInline declaration to read:
class ChoiceInline(admin.TabularInline):
    #...
With that TabularInline (instead of StackedInline), the
related objects are displayed in a more compact, table-based format:

Note that there is an extra “Delete?” column that allows removing rows added using the “Add Another Choice” button and rows that have already been saved.
Customize the admin change list
Now that the Question admin page is looking good, let’s make some tweaks to the “change list” page – the one that displays all the questions in the system.
Here’s what it looks like at this point:
By default, Django displays the str() of each object. But sometimes it’d be
more helpful if we could display individual fields. To do that, use the
list_display admin option, which is a
tuple of field names to display, as columns, on the change list page for the
object:
class QuestionAdmin(admin.ModelAdmin):
    # ...
    list_display = ('question_text', 'pub_date')
Just for good measure, let’s also include the was_published_recently custom
method from Tutorial 1:
class QuestionAdmin(admin.ModelAdmin):
    # ...
    list_display = ('question_text', 'pub_date', 'was_published_recently')
Now the question change list page looks like this:

You can click on the column headers to sort by those values – except in the
case of the was_published_recently header, because sorting by the output
of an arbitrary method is not supported. Also note that the column header for
was_published_recently is, by default, the name of the method (with
underscores replaced with spaces), and that each line contains the string
representation of the output.
You can improve that by giving that method (in polls/models.py) a few
attributes, as follows:
class Question(models.Model):
    # ...
    def was_published_recently(self):
        return self.pub_date >= timezone.now() - datetime.timedelta(days=1)
    was_published_recently.admin_order_field = 'pub_date'
    was_published_recently.boolean = True
    was_published_recently.short_description = 'Published recently?'
For more information on these method properties, see
list_display.
Edit your polls/admin.py file again and add an improvement to the
Question change list page: filters using the
list_filter. Add the following line to
QuestionAdmin:
list_filter = ['pub_date']
That adds a “Filter” sidebar that lets people filter the change list by the
pub_date field:
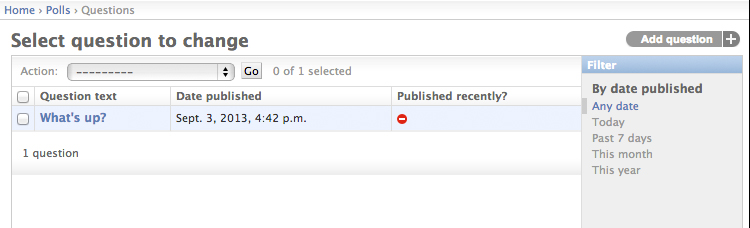
The type of filter displayed depends on the type of field you’re filtering on.
Because pub_date is a DateTimeField, Django
knows to give appropriate filter options: “Any date,” “Today,” “Past 7 days,”
“This month,” “This year.”
This is shaping up well. Let’s add some search capability:
search_fields = ['question_text']
That adds a search box at the top of the change list. When somebody enters
search terms, Django will search the question_text field. You can use as many
fields as you’d like – although because it uses a LIKE query behind the
scenes, limiting the number of search fields to a reasonable number will make
it easier for your database to do the search.
Now’s also a good time to note that change lists give you free pagination. The
default is to display 100 items per page. Change list pagination, search boxes, filters, date-hierarchies, and
column-header-ordering
all work together like you think they should.
Customize the admin look and feel
Clearly, having “Django administration” at the top of each admin page is ridiculous. It’s just placeholder text.
That’s easy to change, though, using Django’s template system. The Django admin is powered by Django itself, and its interfaces use Django’s own template system.
Customizing your project’s templates
Create a templates directory in your project directory (the one that
contains manage.py). Templates can live anywhere on your filesystem that
Django can access. (Django runs as whatever user your server runs.) However,
keeping your templates within the project is a good convention to follow.
Open your settings file (mysite/settings.py, remember) and add a
DIRS option in the TEMPLATES setting:
TEMPLATES = [
    {
        'BACKEND': 'django.template.backends.django.DjangoTemplates',
        'DIRS': [os.path.join(BASE_DIR, 'templates')],
        'APP_DIRS': True,
        'OPTIONS': {
            'context_processors': [
                'django.template.context_processors.debug',
                'django.template.context_processors.request',
                'django.contrib.auth.context_processors.auth',
                'django.contrib.messages.context_processors.messages',
            ],
        },
    },
]
DIRS is a list of filesystem directories to check
when loading Django templates; it’s a search path.
Now create a directory called admin inside templates, and copy the
template admin/base_site.html from within the default Django admin
template directory in the source code of Django itself
(django/contrib/admin/templates) into that directory.
Where are the Django source files?
If you have difficulty finding where the Django source files are located on your system, run the following command:
$ python -c "
import sys
sys.path = sys.path[1:]
import django
print(django.__path__)"
Then, just edit the file and replace
{{ site_header|default:_('Django administration') }} (including the curly
braces) with your own site’s name as you see fit. You should end up with
a section of code like:
{% block branding %}
<h1 id="site-name"><a href="{% url 'admin:index' %}">Polls Administration</a></h1>
{% endblock %}
We use this approach to teach you how to override templates. In an actual
project, you would probably use
the django.contrib.admin.AdminSite.site_header attribute to more easily
make this particular customization.
This template file contains lots of text like {% block branding %}
and {{ title }}. The {% and {{ tags are part of Django’s
template language. When Django renders admin/base_site.html, this
template language will be evaluated to produce the final HTML page.
Don’t worry if you can’t make any sense of the template right now –
we’ll delve into Django’s templating language in Tutorial 3.
Note that any of Django’s default admin templates can be overridden. To
override a template, just do the same thing you did with base_site.html –
copy it from the default directory into your custom directory, and make
changes.
Customizing your application’s templates
Astute readers will ask: But if DIRS was empty by
default, how was Django finding the default admin templates? The answer is
that, since APP_DIRS is set to True,
Django automatically looks for a templates/ subdirectory within each
application package, for use as a fallback (don’t forget that
django.contrib.admin is an application).
Our poll application is not very complex and doesn’t need custom admin templates. But if it grew more sophisticated and required modification of Django’s standard admin templates for some of its functionality, it would be more sensible to modify the application’s templates, rather than those in the project. That way, you could include the polls application in any new project and be assured that it would find the custom templates it needed.
See the template loading documentation for more information about how Django finds its templates.
Customize the admin index page
On a similar note, you might want to customize the look and feel of the Django admin index page.
By default, it displays all the apps in INSTALLED_APPS that have been
registered with the admin application, in alphabetical order. You may want to
make significant changes to the layout. After all, the index is probably the
most important page of the admin, and it should be easy to use.
The template to customize is admin/index.html. (Do the same as with
admin/base_site.html in the previous section – copy it from the default
directory to your custom template directory.) Edit the file, and you’ll see it
uses a template variable called app_list. That variable contains every
installed Django app. Instead of using that, you can hard-code links to
object-specific admin pages in whatever way you think is best. Again,
don’t worry if you can’t understand the template language – we’ll cover that
in more detail in Tutorial 3.
When you’re comfortable with the admin site, read part 3 of this tutorial to start working on public poll views.